Sunday, June 14, 2020

Lyla's Star Quilt


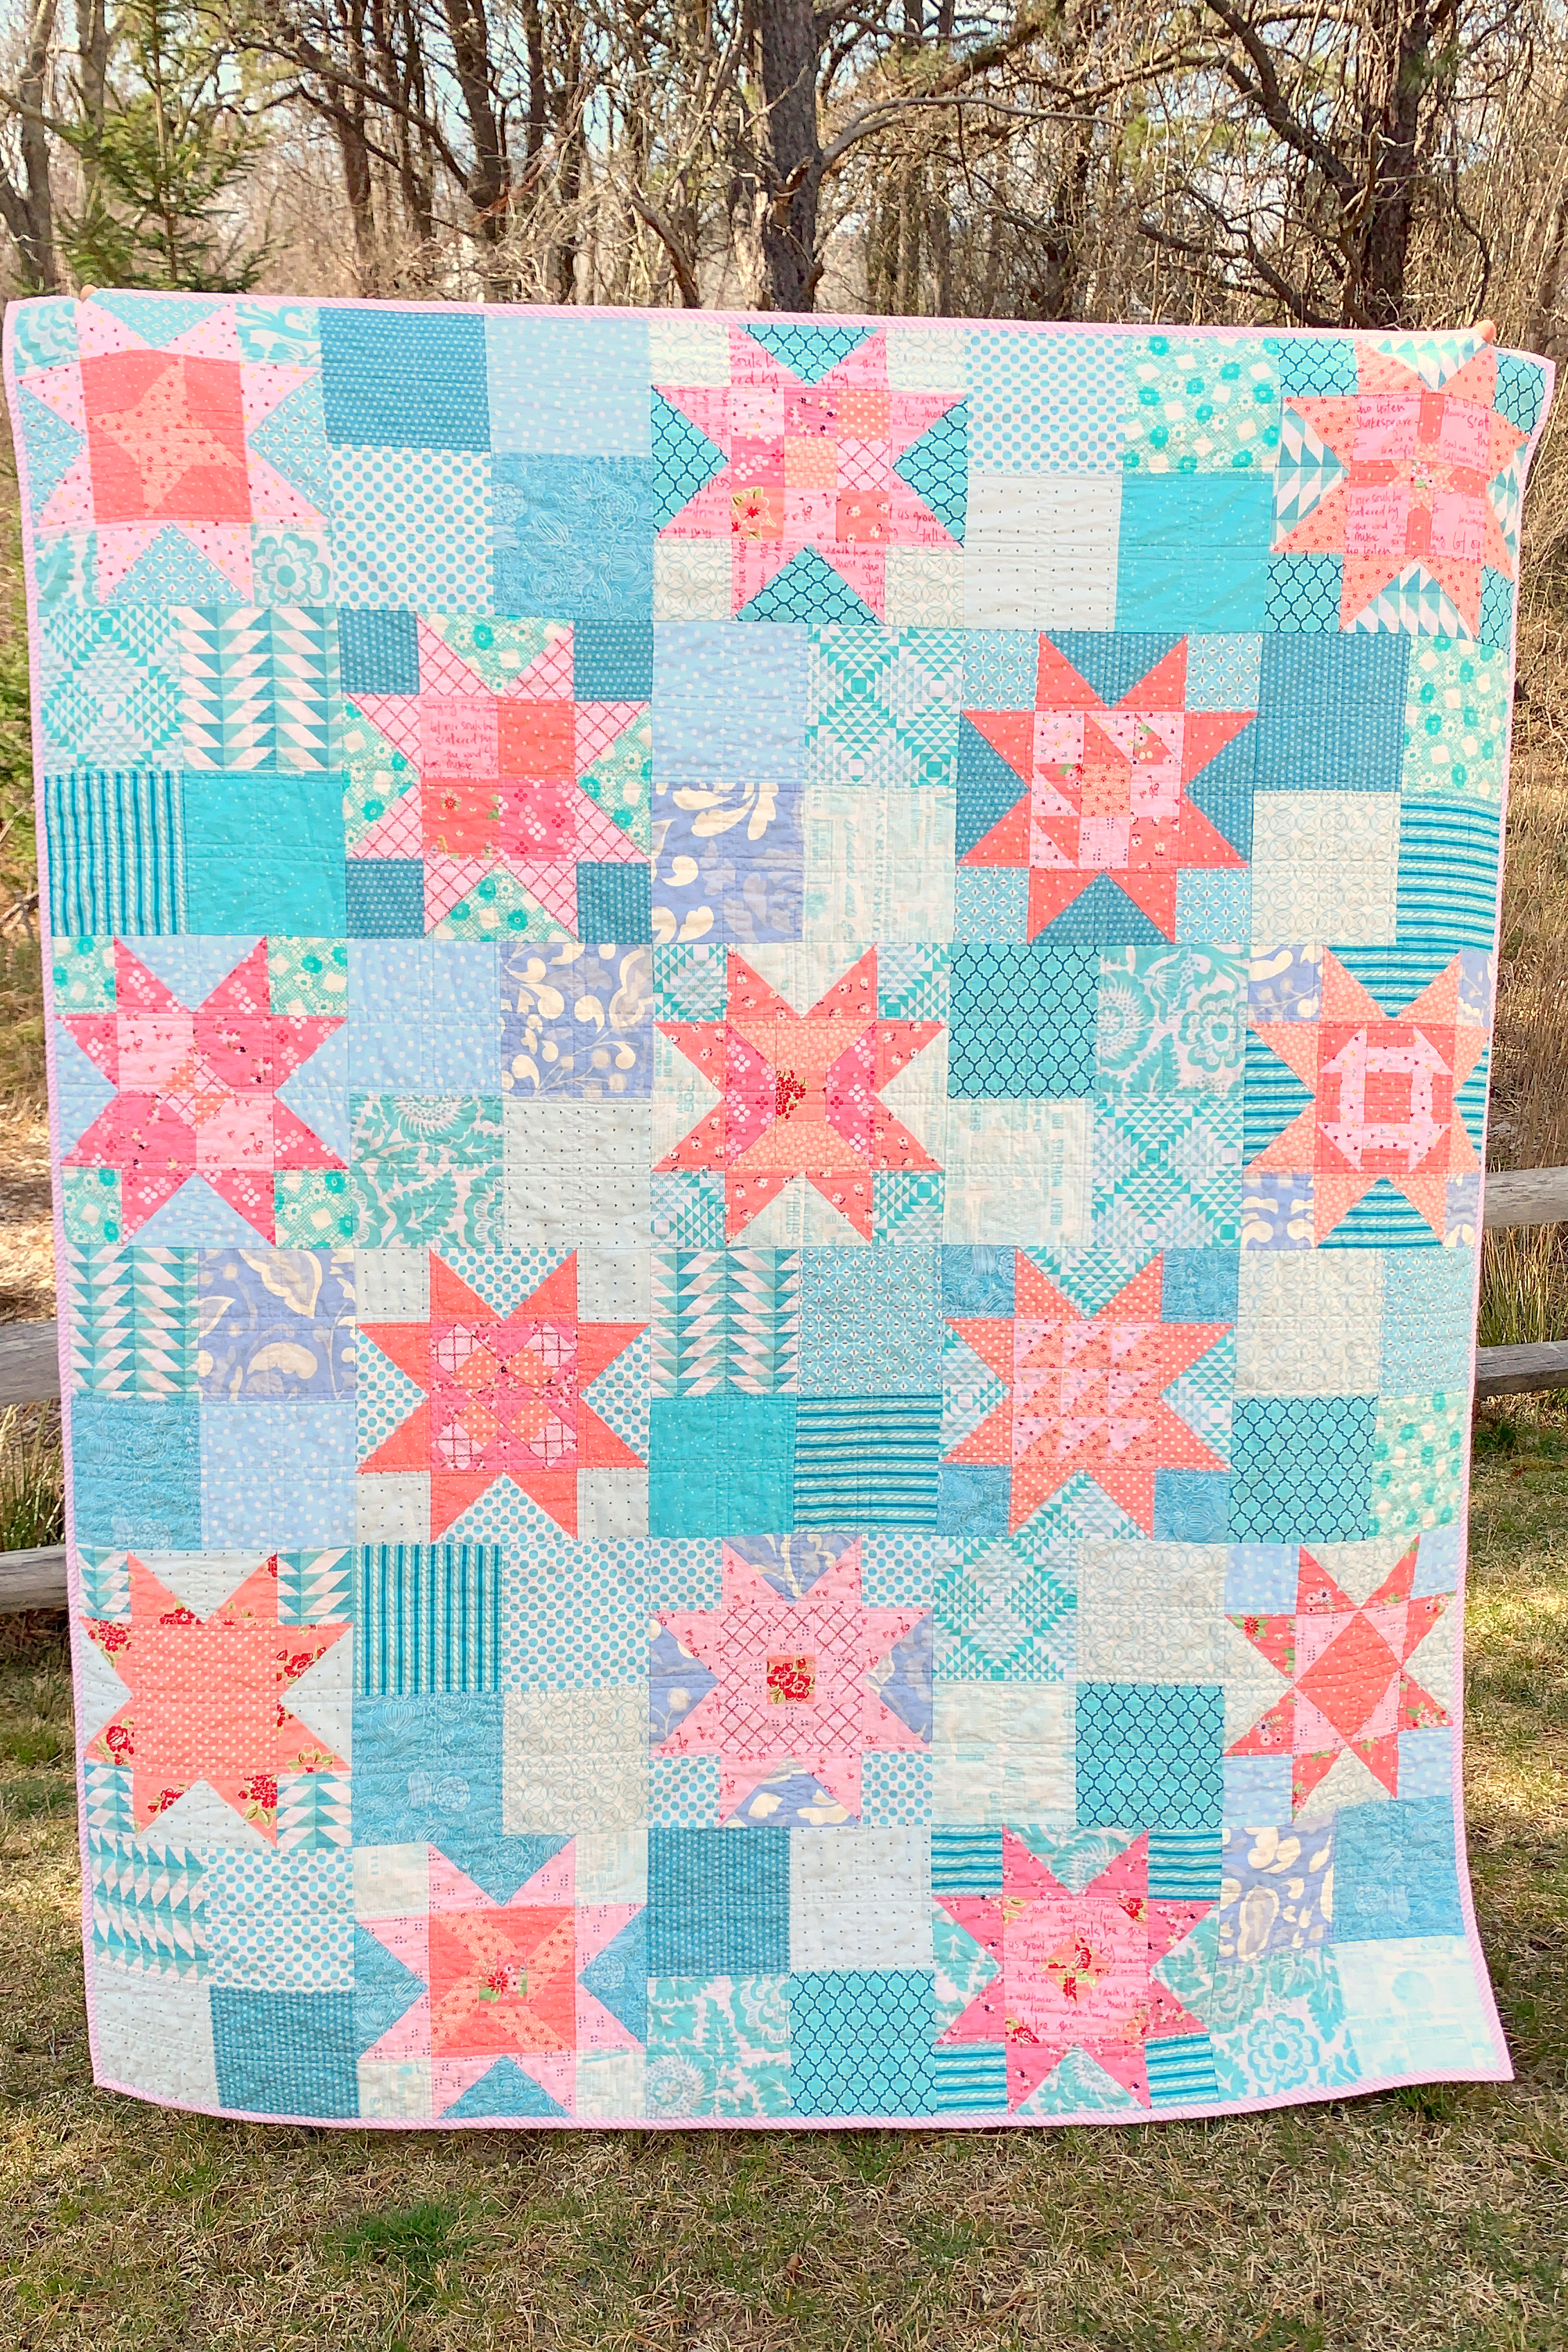
Pattern: Little Miss Sawtooth Star by Melanie Traylor

Top Fabrics: February 2019 Sew Colorful Pink Fat Quarter Bundle by Fat Quarter Shop ("Pink Xs," "Pink Mini Flowers," "Pink Ruffle Plaid," and "Pink Chickens" from Simple Goodness by Tasha Noel for Riley Blake Designs; "Pink Meadow Flower Patch," "Pink Meadow Spot," and "Pink Meadow Text" from In the Meadow by Keera Job for Riley Blake Designs; "Dandy Dot Petal," and "Perky Petals Petal" from 30's Playtime 2018 by Chloe's Closet for Moda Fabrics; "55185-13 Coral" (coral with white polka dot) and "55188-13 Coral" (coral with red and green flowers) from Little Snippets by Bonnie & Camille for Moda Fabrics; "Coral Daisy" from Farm Girl Vintage by Lori Holt for Riley Blake Designs; "Pink Cross Stitch," "Pink Daisy," and "Pink Floral" from Vintage Keepsakes by Beverley McCullough for Riley Blake Designs)Aqua Fat Quarter Bundle by Mixed Designers for Southern Fabric (Etsy), and misc. aqua fat quarters from Tumbleweed Quilt Shop

Backing Fabric: "Pink Ball" from Pemberley by Citrus & Mint for Riley Blake Designs

Binding Fabric: Candy Pink Candy Stripe from Sweet Shoppe by Andover Fabrics

Batting: 80/20 Silky Blend Happy Cloud Quilt Batting by Fat Quarter Shop

Started: late September or early October 2019

Completed: April 2020

Made for: Lyla Rose

Notes: After reading Tomi dePaola's "The Quilt Story" one night, Lyla requested "a quilt with pink stars on a blue sky." I had been making all sorts of excuses about why I didn't need to do the Little Miss Sawtooth Stars Quilt Along, but obviously it was meant to be!


Charm Square Tree Skirt


Pattern: Charm Pack Christmas Tree Skirt by Fat Quarter Shop

Top Fabrics: Little Tree by Lella Boutique charm pack, Little Tree "Tin Snow"

Backing Fabric: Little Tree "Poem Frost"

Binding Fabric: Little Tree "Farmhouse Stripe Snow Cranberry"

Started: unknown, but I finished piecing the top in early September 2019

Completed: April 28, 2020

Made for: our family

Notes: I was determined to finish this in time to use for Christmas 2019, so I purchased a label dated 2019. But the first Christmas it will actually be used will be Christmas 2020. I also attached 2 of the blocks backwards, so not all of the scallops point outwards like they're supposed to.


Christmas "Crazy Quilt"


Pattern: my own, using Lori Holt's Crazy Quilt Papers

Top Fabrics: Merriment by Gingiber layer cake, Moda Bella Solids Snow jelly roll 

Backing Fabric: Merriment by Gingiber "Holly Snowflakes"

Binding Fabric: Merriment by Gingiber "Cocoa Fur"

Batting: 80/20 Silky Blend Happy Cloud Quilt Batting by FQS 

Started: October 2019 

Completed: December 22, 2019 

Made for: Nate 

Notes: First quilt I basted using the "pool noodle" technique.


Quilt for Baby Maloney


Pattern: Lucky Star Block by Amanda Rolfe, adapted from Super Star by Riley Blake Designs

Top Fabrics: Kona Cotton Bright Rainbow Fat Quarter Bundle From Robert Kaufman (I believed I used K001-323 Flame, K001-1077 Citrus, K001-25 Ocean, and K001-1301 Purple), Details Noir Q4481-669 by Hoffman Fabrics (a digitally printed panel that cuts apart into 8 fat quarters)

Backing Fabric: black with white polka dot, and pinwheels made from Kona scraps from the top

Binding Fabric: black and white stripe

Started: August 2019

Completed: on or around September 29. 2019

Made for: Carly Maloney's baby Ben, born January 2020


*tap tap tap* Is this thing on?

Wow! It's been a hot minute, hasn't it!? My creative life has gone in different directions in the past few years, with stamping and card making taking more and more of a back seat until, well... basically I don't do any paper crafts anymore. I'm still faithfully using (and loving) the Project Life App for our annual "family yearbook," and I haul everything out and try to remember how to scrapbook for a few weeks once a year to make a physical December Daily album. Over the past several years, my creative pursuits have been focused entirely on knitting. It was basically all I did during any moments of downtime, and nearly every evening was spent knitting for hours on end. Then somehow, over the course of 2018 and 2019, I found myself finishing fewer and fewer projects. More and more, my hours were being spent in front of my sewing machine, working on project bags for my Etsy shop, a handful of clothing items for Lyla, a few fun items for myself. During a lot of 2019, and all of 2020 so far, literally the only time I even picked up my knitting was at the weekly knitting night at the library.

At some point during the last year I decided I was going to take up quilting in earnest. I often listen to the American Patchwork & Quilting podcast in the car, and it seems that a common interview question is "When did you start quilting?" or "What was your first quilt?" Every time I hear it, I try to think how I would answer that question. And I honestly have no idea if I even could. I don't remember learning to sew (or learning to knit, for that matter) - It's just something that feels like I've always known the very basics of... but not much more than the very basics. I did take that quilting seminar in middle school with Mrs. Amaru. We traced cardboard squares onto fabric with Sharpies, sandwiched our quilts with cheap, fluffy polyester batting, and tied the layers together. It was fun, but I don't remember learning anything I didn't already know. (In fact, it's likely that I may have been a little bit of a know-it-all during that seminar.) Over the years, I'd made a bunch of quilted things here and there, but I'd never really made a quilt. And even though it happened within the past year, I don't really know when or why I made the decision to focus on quilting - And I can't really point to my first real quilt. But it's become basically my main focus now, and the way I spend nearly all of my "me time." So I decided to resurrect the ol' blog as a way to keep track of my quilting projects. (Tyler says I should find a partner who codes and create a Ravelry for quilters. LOL) So hello to you if you happen to be following along - Although really my intention is to create a record for myself, but I'm happy to have you if you're here. So... here we go!


Friday, August 14, 2015

Video Tutorial: Multi-Color Stamping with Sponge Daubers

Hey there! A while back, I posted a video on YouTube and I never got around to sharing it here. It's a tutorial on one of my favorite techniques - inking up a stamp with sponge daubers to get a multi-color image. This technique also gives you a great blended look. It works best on solid stamps with a lot of area, not line-art images. I used one of the new Hostess stamp sets called Silhouettes & Script. If you place a Stampin' Up! order of at least $150, this is one of the exclusive items you can choose as a Stampin' Rewards benefit.

Here's the card I share in the video...


And here's the technique!


There are a few other cards that I show in the video that I made using the same technique and stamp set. Here they are...


Hope you enjoy the video and that you give this technique a try! As always, holler if you have any questions.

Happy Stampin'! :)

Wednesday, August 12, 2015

Vintage-Inspired Baby Headband

Baby headbands have been trendy for a while now, and I have always loved them. So I bet you can imagine how excited I am to finally have a beautiful baby girl - who is, of course, very beautiful even without accessories - to wear headbands! :) I recently decided that I'm going to try my hand at making and selling headbands and highbrows for babies and little girls. I was able to execute one of my first ideas last night - which just so happens to use almost exclusively Stampin' Up! materials. 


I had so much fun making this headband for Lyla and I think it turned out so cute! She's not a huge fan of headbands, but I'm trying to have her wear them more often and I hope she'll come around. ;)


The Stampin' Up! supplies I used are Crumb Cake 1-1/4" Striped Grosgrain Ribbon, Tip Top Taupe 1" Dotted Lace Trim, Mint Macaron 1" Dotted Lace Trim, and a retired snowflake embellishment from last year's Holiday Catalog. But there are a lot of other buttons and things that would work, and there will be a new snowflake embellishment in this year's Holiday Catalog, starting on September 1st! :)


I also used champagne 5/8" fold over elastic from Elastic By The Yard, a marabou puff from Wholesale DeZigns on Etsy, and some felt from the fabric store. When I'm making my own flowers, I like to use Fabri-Tac from Beacon Adhesives, and I use hot glue to assemble the headband. 

Thanks for stopping by. I hope you have a great day! :)

Friday, June 26, 2015

Stampin' 101 Tutorial - Stamp-A-Ma-Jig Tool

I've gotten so many requests for a tutorial on using the Stamp-A-Ma-Jig tool. I've been meaning to make this video for ages, and I finally got it done! :)


The Stamp-A-Ma-Jig is one of my all-time favorite tools - I really don't think I could make a card without it. It's a stamp positioning system that allows you to see exactly where your image is going to stamp. It's especially useful for sentiments, and sets that involve layering stamps on top of one another to create a detailed image. (Stampin' Up! refers to this as "two step stamping," and these sets now tend to be photopolymer for easy lining up. But the Stamp-A-Ma-Jig is indispensable for older clear-mount or wood-mount two-step stamps.)

Another thing I love about the Stamp-A-Ma-Jig? It allows me to "try out" different positions for a stamp before I commit to anything on my card. Say I can't decide where I want my sentiment to be. Or maybe I stamped one flower, and I can't decide if I want a second flower to its right or its left. Since the Stamp-A-Ma-Jig imaging sheet is clear, I can move it around on my card to see exactly what my stamped image will look like in all the places I'm considering stamping it. Awesome! :)

So are you intrigued? Or maybe you're one of the folks who's always kind of wondered about the Stamp-A-Ma-Jig, but never really figured out what it's all about. Go ahead and check out my video demo below, or over on my YouTube channel. Let me know if you have any questions.


Oh, and by the way, here's the finished card that I'm working on in the video. It uses one of my favorite new sets, Garden in Bloom. The sentiments are from a super cute and clever set called Words of Truth. "I love you more than grilled cheese" is my favorite sentiment from this set! LOL.


Happy Stampin'! :)

Sunday, June 21, 2015

Start-to-Finish Sunday #42 - Watercolor Wings

Wait a minute. I know what you're thinking. Start-to-Finish Sunday?? Doesn't that mean a video??? Yes! My first STFS video since September! Baby Lyla actually let me get a ton of crafting the other day - including THREE videos! So stay tuned. :)

Today's card features one of the new sets from the 2015 Stampin' Up! catalog. It's called Watercolor Wings. Now, I'm not a big butterfly person, even though they're always really popular. But you guys know how much I like watercoloring, and anything that creates a watercolor look. This set fits that bill. It's made up of multiple images that you layer together to create really stunning butterflies. I love it for a tone-on-tone look with layered shades of the same color, but I'm also really excited to play with this set and try all sorts of color combinations. Which is where this card comes in!


This card was inspired by one that Alison Barclay shared on her blog. I immediately fell in love with this very unique color combination. I never would have thought to put Blushing Bride and Watermelon Wonder with Night of Navy - let alone combining them in one image. But I love it! (I also added a little bit of Smoky Slate.) The sentiment is from a stamp set called Hello Life.


In the video, I show you how to assemble the different stamps in this set to create these beautiful layered watercolor-look butterflies. You can check it out below, or over on my YouTube channel. Enjoy!


Happy Stampin'! :)

Friday, June 5, 2015

a belated introduction...


Lyla Rose
May 14, 2015
8:58 AM
4 lb. 10 oz.
18 inches 

She was born at 37 weeks via planned c-section. Thankfully, she did not need any interventions whatsoever and has been completely healthy and growing beautifully. The surgery was amazing and my recovery was uneventful and easy. We are settling into a routine at home - although she keeps us on our toes still! - and I'm grateful that daddy hasn't had to go back to work full-time yet. We're looking forward to this summer as a family of three!